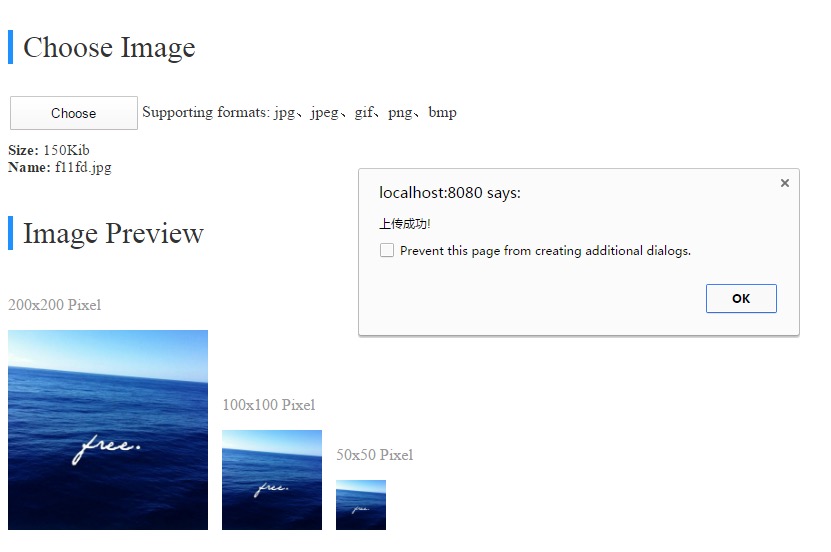
效果:
![]()
用CSS做了一些界面上的处理,预览是用HTML5中的File和FileRead对象来实现(具体看下文代码注释中描述),AJAX上传部分主要用到了FormData对象,该对象的作用就是可以让AJAX来异步上传一个二进制文件。
后端的处理代码用到是Servlet中提供的两个框架,分别是: commons-fileupload-1.3.1.jar和commons-io-2.4.jar,可以在: http://archive.apache.org/dist/commons/ 下载到这2个jar包.
下面的实现代码中,会对CSS,JS,以及后端的Java部分进行说明,相关的HTML5对象会提供详细的文档链接。
最后推荐大家 Web API 接口一览表: https://developer.mozilla.org/zh-CN/docs/Web/API 这个地方。
理由是:当使用Javascript编写网页代码时,有很多API可以使用并提供相关的示例代码。
前台界面及处理代码
1
2
3
4
5
6
7
8
9
10
11
12
13
14
15
16
17
18
19
20
21
22
23
24
25
26
27
28
29
30
31
32
33
34
35
36
37
38
39
40
41
42
43
44
45
46
47
48
49
50
51
52
53
54
55
56
57
58
59
60
61
62
63
64
65
66
67
68
69
70
71
72
73
74
75
76
77
78
79
80
81
82
83
84
85
86
87
88
89
90
91
92
93
94
95
96
97
98
99
100
101
102
103
104
105
106
107
108
109
110
111
112
113
114
115
116
117
118
119
120
121
122
123
124
125
126
127
128
129
130
131
132
133
134
135
136
137
138
139
140
141
142
143
144
145
146
147
148
149
150
151
152
153
154
155
156
157
158
159
160
161
162
163
164
165
166
167
168
169
170
171
172
173
174
175
176
177
178
179
180
181
182
183
184
185
186
187
188
189
190
191
192
193
194
195
196
197
198
199
200
201
202
203
204
205
206
207
208
| <!DOCTYPE html>
<html>
<head>
<meta charset="UTF-8">
<title>AJAX图片上传</title>
<style>
body {
color: #333;
}
p.title {
font-size: 30px;
width: 500px;
hegith: auto;
padding-left: 10px;
border-left: 5px solid dodgerblue;
}
div.big,div.middle,div.small {
display: inline-block;
margin-right: 10px;
}
.big img.avatar {
width: 200px;
height: 200px;
}
.middle img.avatar {
width: 100px;
height: 100px;
}
.small img.avatar {
width: 50px;
height: 50px;
}
.desc {
color: #999;
}
.wrapper {
position: relative;
}
.wrapper input {
width: 130px;
height: 38px;
cursor: pointer;
}
.wrapper .portrait-filebtn {
outline: none;
border: none;
padding: 0;
background: url("https://ss1.bdstatic.com/5KZ1bjqh_Q23odCf/static/princess/img/setportrait_btn_da8845e1.png") no-repeat 0 0px;
}
.wrapper .portrait-file {
opacity: 0;
position: absolute;
left: 0;
top: 0;
}
div#info {
padding: 10px 0;
font-size: 15px;
}
</style>
<script type="text/Javascript">
window.onload = function () {
var fileInput = document.getElementById("fileImg");
var infoDiv = document.getElementById("info");
var avatarImgs = document.getElementsByClassName("avatar");
fileInput.addEventListener("change", function (event) {
var file = this.files[0];
var fileSize = (file.size / 1024).toFixed();
var fileName = file.name;
infoDiv.innerHTML = "<b>Size: </b>" + fileSize + "Kib<br />" + "<b>Name: </b>" + fileName;
var fileReader = new FileReader();
fileReader.readAsDataURL(file);
fileReader.onload = function (event) {
for (var i = 0; i < avatarImgs.length; i++) {
var avatarImg = avatarImgs[i];
avatarImg.src = this.result;
}
ajaxSaveToServer(file);
}
},false);
};
function ajaxSaveToServer(imgFile) {
var xhr = new XMLHttpRequest();
xhr.open("post", "saveImg",true);
var formData = new FormData();
formData.append("img",imgFile);
xhr.send(formData);
xhr.onreadystatechange = function () {
var state = xhr.readyState;
var status = xhr.status;
if (state == 4 && status == 200) {
alert(xhr.responseText);
}
}
}
</script>
</head>
<body>
<p class="title">Choose Image</p>
<div class="wrapper">
<input type="button" class="portrait-filebtn" value="Choose">
<input type="file" class="portrait-file" name="file" id="fileImg" accept=".jpg,.png,.gif,.bmp,.jpeg">
<span class="pass-portrait-msg">Supporting formats: jpg、jpeg、gif、png、bmp</span>
</div>
<div id="info">
</div>
<p class="title">Image Preview</p>
<div class="preview">
<div class="big">
<p class="desc">200x200 Pixel</p>
<img src="" class="avatar">
</div>
<div class="middle">
<p class="desc">100x100 Pixel</p>
<img src="" class="avatar">
</div>
<div class="small">
<p class="desc">50x50 Pixel</p>
<img src="" class="avatar">
</div>
</div>
</body>
</html>
|
上面在注释里js和WEB_API的介绍说完了,这里说一下css代码相关的地方。
首先。class为wrapper的div,需要设置position为relative,然后将里面的第二个input,也就是文件选择的input。
它的position设置为absolute,absolute会相关于第一个position为非static的父元素来定位。
所以这里就是相对于刚才那个class为container的div来定位,然后我们让它left和top都为0,让它紧贴着div,然后再给它的透明度设置为0,通过opacity: 0;来设置。
这样子做了之后他前面的类型为button的input就会”覆盖”它,说是覆盖其实是因为透明度为0,人的眼睛看不到了。但是在页面上还是存在,所以我们不能设置display为none这个样式。因为我们需要能点击它。
其他的css就是我个人的一些处理,没什么特别的地方。
再然后我们来看服务端java代码,我用的servlet配合2个jar包来实现上传。
1
2
3
4
5
6
7
8
9
10
11
12
13
14
15
16
17
18
19
20
21
22
23
24
25
26
27
28
29
30
31
32
33
34
35
36
37
38
39
40
41
42
43
44
45
46
47
48
49
50
51
52
53
54
55
56
57
58
59
60
61
62
63
64
65
66
67
68
69
70
71
72
73
74
75
76
77
78
79
80
81
82
83
84
85
86
87
88
89
90
91
92
93
94
95
96
97
98
99
100
101
102
103
104
105
106
107
108
109
110
111
112
113
114
115
116
| package com.xxxx.servlet;
import org.apache.commons.fileupload.FileItem;
import org.apache.commons.fileupload.FileUploadException;
import org.apache.commons.fileupload.disk.DiskFileItemFactory;
import org.apache.commons.fileupload.servlet.ServletFileUpload;
import javax.servlet.ServletException;
import javax.servlet.annotation.WebServlet;
import javax.servlet.http.HttpServlet;
import javax.servlet.http.HttpServletRequest;
import javax.servlet.http.HttpServletResponse;
import java.io.File;
import java.io.IOException;
import java.io.PrintWriter;
import java.util.Arrays;
import java.util.List;
public class SaveFile extends HttpServlet {
private static final String UPLOAD_DIRECTORY = "upload";
private static final String File_SEPARATOR = File.separator;
private static final String[] ALLOWED_TYPE = { "image/jpg","image/jpeg","image/png","image/gif","image/bmp" };
private boolean checkContentype (String contentType) {
if ( contentType == null ) return false;
List<String> list = Arrays.asList(ALLOWED_TYPE);
return list.contains(contentType);
}
protected void doPost (HttpServletRequest request,HttpServletResponse response)
throws ServletException,IOException {
request.setCharacterEncoding("utf-8");
response.setContentType("text/html;charset=utf-8");
PrintWriter writer = response.getWriter();
try {
if ( !ServletFileUpload.isMultipartContent(request) ) {
writer.write("上传失败");
return;
}
DiskFileItemFactory factory = new DiskFileItemFactory();
ServletFileUpload fileUpload = new ServletFileUpload(factory);
List<FileItem> fileItems = fileUpload.parseRequest(request);
FileItem fileItem = fileItems.get(0);
String contentType = fileItem.getContentType();
if ( !checkContentype(contentType) ) {
writer.write("非法文件,请选择正确的图片文件");
return;
}
String uploadPath = getServletContext().getRealPath(File_SEPARATOR + UPLOAD_DIRECTORY);
File uploadPathFile = new File(uploadPath);
if ( !uploadPathFile.exists() ) {
uploadPathFile.mkdir();
}
String name = fileItem.getName();
if ( name.contains(File_SEPARATOR) ) {
name = name.substring(name.lastIndexOf(File_SEPARATOR) + 1);
}
File imgFile = new File(uploadPath + File_SEPARATOR + name);
fileItem.write(imgFile);
fileItem.delete();
if ( imgFile.exists() ) {
writer.write("上传成功!");
}
} catch ( FileUploadException e ) {
e.printStackTrace();
} catch ( Exception e ) {
e.printStackTrace();
} finally {
writer.flush();
writer.close();
}
}
protected void doGet (HttpServletRequest request,HttpServletResponse response)
throws ServletException,IOException {
doPost(request,response);
}
}
|
到此就结束了。没什么技术含量,主要是我写来玩的,同时也只用于参考。
大家可以看一下上面用的几个HTML5 API对象来了解更多,以便按照自己的需求来开发。
这里推荐大家阅读张鑫旭的一篇相关博文以获得更多相关的知识《基于HTML5的可预览多图片Ajax上传》
